Saturday, April 23, 2011

S-04 Fermentis fermentation temperature

Contrary to popular belief, S-04 Fermentis dry ale yeast ferments just fine in the upper 50's, temperature-wise. First, start with a warm pitch (warm pitch to me is 68F), then let the beer settle to 57-58F within 24 hours. Fermentation does kick off quite rapidly [6 hours]. It will fully attenuate after 3 weeks. Taste is fine, no diacetyl rest needed. Sometimes this is necessary even with cool fermented ale yeasts. But, no funny flavors are there because of the cold temperatures.

This is with no starter, and direct pitch. Never have used water first on dry yeasts. I have not found a reason to.

Sunday, April 3, 2011

Amarillo Pale Ale

Below is a 10gallon batch of Amarillo Pale Ale. I would have rather done Simcoe, but I still have a 1# bag of Amarillo pellet hops in the freezer. Next time the opportunity comes around to buy 1# of Simcoe, I will probably take it. If you are going to use this recipe, cut everything in half to make it 5 gallons.


Amarillo PA


BeerTools Pro Color Graphic


Size: 39.46 L Efficiency: 64.0% Attenuation: 76.9%


Original Gravity: 1.052 (1.045 - 1.060) ===============#================


Terminal Gravity: 1.012 (1.010 - 1.015) ==============#=================


Color: 9.84 (5.0 - 14.0) ================#===============


Alcohol: 5.22% (4.5% - 6.2%) ==============#=================


Bitterness: 45.5 (30.0 - 45.0) ========================#=======


Ingredients:


22 lb 2-Row Brewers Malt


1.0 lb Caramel Pils


1.0 lb Crystal 60


1.55 oz Magnum-PLMG (13.0%) - added during boil, boiled 60 min


0.75 oz Amarillo (8.5%) - added during boil, boiled 15.0 min


1.25 oz Amarillo (8.5%) - added during boil, boiled 5.0 min


2.5 oz Amarillo (8.5%) - dry hop


2 ea Fermentis S-04 Safale S-04


Schedule:


Ambient Air: 58 °F Source Water: 40 °F Elevation: 0.0 m


00:31:56 Mash In - Liquor: 33.0 L; Strike: 164.63 °F; Target: 152 °F 00:41:56 Rest - Rest: 35 min; Final: 151.5 °F 01:11:56 Sparge - FirstRunnings: 0.0 L sparge @ 168 °F, 20.0 L collected, 15 min; Second: 31.0 L sparge @ 200 °F, 31.0 L collected, 15 min; Total Runoff: 52.43 L


Results generated by BeerTools Pro 1.5.10

Sunday, May 2, 2010

Summit Brewing Co. IRA

SummitBrewing

Today I had the opportunity to drink the India Style Rye Ale from Summit Brewing Co's Unchained Series. Lets say I was more than impressed. It was a medium color spicy pale ale that was not overwhelming. The rye came through tremendously, but not too much to make it undrinkable. The cup of beer (served at Sea Salt Eatery) went very nicely with the fried fish sandwich, and was gone before I knew it. Not an especially bitter beer, which made it easy to pass the time with and not get shocked upon every sip. The Citra hops are very nice, and I may try them someday in my homebrew (if I can find them).

Sunday, April 11, 2010

Brewtroller Ordered

Yes, the Brewtroller has been ordered. I have big expectations for it.. but, in the beginning I will just use it for monitoring and simple boil and heating stages. I have some ASCO valves in-house, but I will not use until much later.

I am curious to see if I can get my pressure transducer to work with the Brewtroller. I am sure I can, it is just a question of what will I NEED to do to get it to work reliably. Seems like most people are concerned with air leakage in the system. I will try to alleviate that by glueing everything up tight.

Saturday, March 6, 2010

Thing to note about last "Perfect" batch of weissbier

The last 10gallon (40L) batch of weissbier turned out perfect. When I say perfect, I mean very little banana, and all clove.

Things to note.
1. Fermentation in the lows 60's (62F or less)
2. Half vial of WLP380 per 5 gallon fermenter, with no starter.
3. Fermentation took >24 hours to kick off (there must have been yeast stress involved)
4. The carboy that had more cold break in it started off a little faster and ended earlier than the carboy with less break inside. One carboy had more cold break than the other because the 10 gallon runoff took place after the wort had a chance to settle from the whirlpool. Normally, I run the wort from the kettle to the carboy immediately after the pump turns off.

Sunday, February 7, 2010

Interesting Brewing Observations

So, 10 gallon batches are now being brewed. I chilled my weissbier wort to 64 degrees in the whirlpool chiller within the kettle. Something I dont normally do is turn the whirlpool pump off long before I transfer the wort to the carboys. This time I let the cold water run for about 10 minutes after I stopped the recirculation . This allowed the break matter to settle towards the bottom.

I transferred the wort to the first carboy, then the second. The first carboy had a particularly large amount of break in it, while the second didnt seem to have so much.

I put equal amounts of liquid yeast into both fermenters, and shook both for over a minute (standard routine).

In general, things were cold (the wort, the room, everything) so fermentation got off to a slow start. But, the interesting factoid is that the carboy with the break material started faster than the other carboy. Also, it ended sooner.

Not only that, the final gravity was lower on the beer with the precipitate in it. As for flavor, they both taste about the same (preliminary findings). The final gravity point difference was about .004.

Next time I will let the recirculation pump run right up until I transfer the wort out, to allow for a more homogenous wort solution.

Sunday, January 10, 2010

Pressure Sensor

I received my free samples from Freescale. The pressure sensor is
MPXV5010DP, and I will be testing it soon enough. I am not sure how I am going to attach it to the top of my sight glass yet, we will see.

Sight Glass Installation

Ok, so I finally installed a sight glass onto my stainless steel megapot. Here I will show what things looked like in the process. Below is the cold water running over the location where I drilled the 7/8" hole. I used a step bit, with cold running water only, no oil. This worked out perfectly, with no problems.
Photobucket
The step bit I used is below. It goes to 7/8". I picked up two of them on ebay for about $14. Worked like a champ.
Photobucket
Below is a picture of the weldless T sightglass fitting I received from http://www.bargainfittings.com/. Inserted into it is a 1/2" MNPT Machined Through Compression Fitting that I received from http://www.brewershardware.com/ along with a 6" temperature probe end to go inside it. The temperature sensor being used is a ds1820, which fits perfectly into the probe end.
Photobucket

Sunday, November 15, 2009

Surly Imperial Brown Update

Got full attenuation on my wort, 78% using US-05 dry yeast. Started with an OG of 1.088 and finished at 1.020. This leaves it at a hair over 9% alcohol level. Initial small sampling indicates that all is well, no alcohol flavor, at all!!!!!!!!!!!!

Excellent initial flavor, I will let it carbonate up a little bit before I have a pint and can fully qualify it.

It has been 5 weeks since the beer was brewed, time can only make it better I suppose, but we'll see.

Saturday, October 17, 2009

Surly AHA Rally

On Oct 10, the AHA (American Homebrewers Association) hosted a rally at the Surly Brewing Company. At first, it was supposed to be a brewery tour, and tasting event. Then, to the surprise of us all, Surly offered to brew a batch of beer, so we could all fill our fermenters with 5 gallons of Surly wort. The trick was that there would be only enough for 160 people or so, due to batch size.

The reservation for this wort fill up expired a few hours after the email announcement. Surly then graciously offered to brew a second batch, so everyone can fill their carboys if they liked. In the picture below, you can see just a fraction of the buckets carboys and kegs.

Ok, so Surly gave away an Imperial Brown Ale wort... the (5 gal approximation, taken from actual percentages in the given real recipe) recipe is below. I tasted the wort, and it is phenominal! I can't wait until it completes.


Surly Imperial Brown


10/10/2009


BeerTools Pro Color Graphic


Size: 21.12 L

Efficiency: 80%

Attenuation: 80.5%

Calories: 296.89 kcal per 12.0 fl oz


Original Gravity: 1.089 (1.045 - 1.060)

================================


Terminal Gravity: 1.017 (1.010 - 1.016)

===========================#====


Color: 24.1 (18.0 - 35.0)

=============#==================


Alcohol: 9.5% (4.3% - 6.2%)

================================


Bitterness: 65.4 (20.0 - 40.0)

================================


Ingredients:


14.5 lb Pale Ale Malt

1.9 lb Brown Malt

.6336 lb Candi Sugar Dark

.3168 lb Crystal 85

.3168 lb Crystal 120

1.3 oz Columbus (15.0%) - added during boil, boiled 60.0 min

0.5 oz Willamette (5.0%) - added during boil, boiled 0.0 min

Results generated by BeerTools Pro 1.5.2


Sunday, October 4, 2009

Northern English Brown Ale

I have decided to try and brew a new type of beer, Northern English Brown... I guess the commercial version of this is Newcastle Nut Brown. I am using some hops that I already have... they are not British, but this is really not a hop-centric beer, so it doesnt matter. Ok, we will see how this turns out. Here is the recipe ->

I will brew within a couple of days.


Northern English Brown

10/4/2009


BeerTools Pro Color Graphic


Size: 44.16 L
Efficiency: 73%
Attenuation: 75%
Calories: 177.61 kcal per 12.0 fl oz
Original Gravity: 1.053 (1.040 - 1.052)
=========================#======
Terminal Gravity: 1.013 (1.008 - 1.013)
=========================#======
Color: 17.83 (12.0 - 22.0)
=================#==============
Alcohol: 5.25% (4.2% - 5.4%)
=====================#==========
Bitterness: 22.4 (20.0 - 30.0)
===========#====================


Ingredients:

19.5 lb Pale Ale
1.5 lb Special Roast Malt
1 lb Victory® Malt
1 lb Light Crystal
1 lb Pale Chocolate
.85 oz Magnum-PLMG (13.0%) - added during boil, boiled 60.0 min
.4 oz Magnum-PLMG (13.0%) - added during boil, boiled 20 min
2 ea Danstar 3767 Nottingham

Results generated by BeerTools Pro 1.5.2


Sunday, March 22, 2009

First Basement Brew

First basement brew took place this week. It was not only the first brew in the basement, it was also the first time I did a 10 gallon boil (actually 13.5). This was all thanks to the 5500W water heating element used in the kettle. The element is not physically mounted to the kettle, but attached to a heatstick so it can be easily removed/cleaned, etc. Here are some things I learned from this whole experience...


1. 5500 watts is more than adequate to boil 13.5 gallons of wort.

2. The absorption ratio of grain is a bit more than I had thought... need to calculate this again.

3. My batch sparging method used on a ten gallon batch is stretching the limits of my 48qt mash tun. Actually, the mash tun is too small if I want to single batch sparge. I was able to finish it with a 2 batch sparge. The liquid did go up to the top a couple of times, but it worked out fine in the end.

4. It is easier to hit mash temps with greater volumes of grain and liquid... definitely a big bonus.

5. Moving the tubing around for the march pump is not entertaining. Will need to put the valves into effect to end this nonsense.

6. The SSR was needed for the water heating element. I would have had boilovers if I had not throttled down the element to 70-80% duty cycle sometimes. The frequency I was running the SSR at was 1Hz. This seems ok. The SSR is mounted to an old pentium/CPU heatsink and fan setup. There are no problems dissipating the heat the SSR puts out.

7. A fan running 240CFM will exhaust a 5500W element's boil with a 18" diameter brew kettle. A 240CFM fan is barely adequate though. I would prefer something over 280CFM.


Sunday, March 1, 2009

Cold Fermentation of Wheat

Since it is a cold winter here (including the upstairs closets), my latest batch of weissbier had the opportunity to ferment in a sub 60F environment. One word (awesome).

Ok, WLP380 will ferment under 60F, and the flavor is great. I am not a big fan of the banana, and, it did not give me any.

The crisp, spicy clove flavor that I long for in a weissbier is ever present, and that is the way it needs to be.

On another note, my extraction efficiency was really bad on that particular batch (around 60%), which made for a slightly thinner beer than I would have liked. It ended at 1.010 FG, whereas I am usually at 1.015FG or so. That is fine. At 4.2% alcohol or so, I can drink a bit more of it at any particular time.

Saturday, January 17, 2009

WB-06 vs WLP380 PT II

Ok, a couple of things went wrong with the last batch after stressing the WLP-380 yeast in the starter.

One is that it may have taken on an infection, although it is very difficult to recognize. I say this due to the fact I fermented the thing at around 68 - 70F, which will throw a lot of esters (smells) that I am not used to. My usual fermenting temp is below 64F. It just didn't smell like a 68-70F weissbier, and I am not talking about banana aroma either.

That all being said, the beer tastes fine, and the slightly strange smell goes away within 5 seconds of pouring the beer into the glass. The color is adequate as well.

WLP380 is still my yeast of choice, because given all that, it still made a fine weissbier.

Sunday, November 30, 2008

Start of Brewing Automation


A good bit of time has been spent on getting the homebrewery going in the basement. This is mostly due to the fact the lugging around large amounts of hot liquid is not so nice. Also, I can go all-electric and be able to control my temperatures a little better.

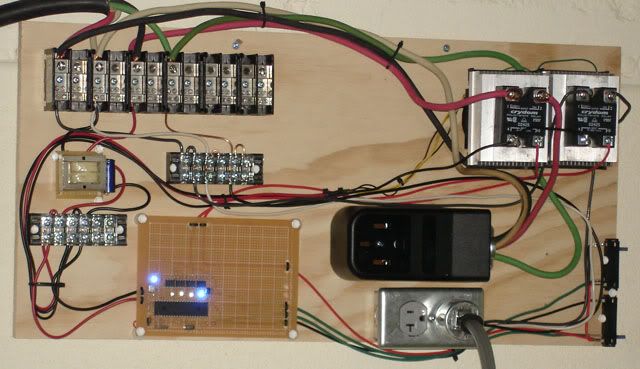
Along with bringing my brewing activities in the basement, I can now automate the system. As seen in the picture above, there is very little automation (due to switches on the side). But, soon enough my computer that is nearby should be able to control about 90% of the process. I will be able to control the SSR units via the computer (well, at least transmit what duty cycle I want, and then the microcontrollers will be able to do the dirty work). Also, I will get feedback into my computer on the temperature levels at the various stations, so it can know what duty cycle to pulse the SSRs at.

I still have to get the workbench to put the mashtun etc on, as well as the march pump with the ASCO solenoids (got them off of ebay). Eventually I will hookup copper pipes as well as a water filter, so I will just need to press a button and the water will fill up. One thing that I am still not so sure about is the water level sensor. Still, I need to figure out how to pull that off. I do not want to have to turn off the water flow manually... that's cheating. The continues...

Saturday, November 15, 2008

WB-06 vs WLP380

So, I have brewed two weissbier batches (same recipe) and have used these two different yeasts [ WB-06 and WLP380]. The WB-06 is the new dry German wheat yeast, and WLP380 is an older liquid strain.

Both wheat beers were fermented around 64 degrees, due to the fact I am not a huge fan of banana flavor, and am going more toward the clove side of things. Both beers also had a 105F rest in the mash schedule, with a 148F sac rest.

I prefer WLP380 over the WB-06. The dry yeast seems a little two tame, with not enough spicyness coming out. Luckily, no banana was thrown at the low fermentation temps either. I must say that for the price, it is not bad, and will do in a pinch if you do not have any liquid yeast lying around (or, are too cheap on that day to buy it).

Currently I am trying to stress the heck out of WLP380, and see how it does. I poured 1/4 tube of really old yeast into a 2 litre starter. It took 3 days to start fermenting. It smells alright, and it seems the starter was not taken over by any bacteriological forms. So, I will dump this starter into my weiss that I am brewing as I type.

Sunday, October 5, 2008

Amazing Weissbier Recipe

Here is a great weissbier recipe taken/adapted from this thread. It was meant to replicate a good Bavarian weissbier. In particular, Schneider-Weiss I believe. Anyhow, it turned out great, and is probably my best weissbier to date.


Weissbier-Selair 08_8_12

15-A Weizen/Weissbier

Date: 8/12/2008


BeerTools Pro Color Graphic


Size: 23.6 L
Efficiency: 66.0%
Attenuation: 76.9%
Calories: 172.0 kcal per 12.0 fl oz

Original Gravity: 1.052 (1.044 - 1.052)

=======================#========

Terminal Gravity: 1.012 (1.010 - 1.014)

===============#================

Color: 10.73 (2.0 - 8.0)

===============================#

Alcohol: 5.22% (4.3% - 5.6%)

===================#============

Bitterness: 12.7 (8.0 - 15.0)

==================#=============

Ingredients:


8.0 lb Pale Wheat Malt

5.0 lb Pilsner Malt

.9 lb Munich Malt

0.25 lb Caramunich® TYPE I

.05 lb Carafa Special® TYPE II

1.04 oz Hallertau Mittelfruh (3.2%) - added during boil, boiled 60 min

0.69 oz Hallertau Mittelfruh (3.2%) - added during boil, boiled 10 min

1 ea White Labs WLP380 Hefeweizen IV Ale


Schedule:


Ambient Air: 74 °F
Source Water: 74 °F
Elevation: 0.0 m

00:14:34 Mash In - Liquor: 10.37 L; Strike: 128.61 °F; Target: 115.0 °F
00:34:34 Rest - Rest: 20 min; Final: 113.9 °F
00:35:34 Infusion - Water: 10.34 L; Temperature: 195.4 °F; Target: 149 °F
01:35:34 Sac. Rest - Rest: 60 min; Final: 145.7 °F
02:05:34 Sparge - FirstRunnings: 2.21 L sparge @ 168 °F, 14.43 L collected, 15 min; Second: 14.26 L sparge @ 200 °F, 13.91 L collected, 15 min; Total Runoff: 28.99 L

Results generated by BeerTools Pro 1.5.0

Sunday, November 11, 2007

Robust Porter

The robust porter I outlined below has turned out pretty well. Very clean and flavorful. One of the better beers I have brewed. It seems that ever since I have been treating my water the beers have been getting better as well.

My basic water additions are 7g of calcium carbonate, 1.5 grams of Epsom Salt, and 1.5 grams of Baking Soda for about 8 to 10 gallons of water (inclusive of water that goes into the mash, of course). This is to replicate Munich water starting with a base of very mineral-less water (which seems to be my local water). The reason I want to replicate Munich water is due to the fact it tastes so good coming straight out of the tap. And, since beer is mostly water, this is a good starting point. In general this has worked for my darker beers, and even the weissbiers. I figured that the Munich brewers were using local untreated water for their weiss as well as their dunkels, so RA may not be as big a factor... Who knows.

A long time ago I had started using Campden tablets to rid the water of chlorine and chloramine. This has been working wonderfully. No need for water filters here...

Sunday, September 30, 2007

It's been a while, how poor of me

Anyhow, drool over this -> Two boils, one batch sparge. You can see where the chiller went in on the boiling sections by the dip in temperature. Below, I will post the recipe i made, it is a Jamil "Robust Porter", pitched US-05.


Photo Sharing and Video Hosting at Photobucket


RobustPorter 29_9_07


12-B Robust Porter


BeerTools Pro Color Graphic


Size: 5.44 gal

Efficiency: 60%

Attenuation: 80.5%

Calories: 197.16 kcal per 12.0 fl oz


Original Gravity: 1.060 (1.048 - 1.065)

==================#=============


Terminal Gravity: 1.012 (1.012 - 1.016)

======#=========================


Color: 29.01 (22.0 - 35.0)

================#===============


Alcohol: 6.31% (4.8% - 6.0%)

============================#===


Bitterness: 31.6 (25.0 - 50.0)

============#===================


Ingredients:


11.5 lb 2-Row Brewers Malt

1.5 lb Munich Malt

1.5 lb Crystal Malt 40°L

.5 lb Black Malt

.75 lb Chocolate Malt

2 oz East Kent Goldings - 4.5% (4.5%) - added during boil, boiled 60.0 min

.75 oz East Kent Goldings - 4.5% (4.5%) - added during boil, boiled 0.0 min


Schedule:


Ambient Air: 78.0 °F

Source Water: 78.0 °F

Elevation: 0.0 m


00:03:00 Mash In - Liquor: 4.33 gal; Strike: 170 °F; Target: 153 °F

01:03:00 Rest - Rest: 60.0 min; Final: 149.0 °F

01:04:00 Infusion - Water: 8.02 L; Temperature: 194.2 °F; Target: 162 °F

01:34:00 Sparge - FirstRunnings: 0.0 L sparge @ 168.0 °F, 4.07 gal collected, 15 min; Second: 4.1 gal sparge @ 170 °F, 4.1 gal collected, 15 min; Total Runoff: 8.35 gal


Notes:


Put some comments here:


Results generated by BeerTools Pro 1.1.0.6-alpha

Wednesday, May 23, 2007

Breaking in a New System

So of course, when I brewed my first batch, my efficiency was poor. Now, the first element I am going to blame this on is the crush. The grains were very coarse in comparison with my previous all-grain brews. My crushed grains are typically more powdery in texture... this time is was not. I know, I need to get a grain mill.

I broke in the system with a Weissbier. Here is the recipe, it is simple, sweet, and should work out just fine. I used WLP300 for the yeast. Good things have been said of WLP380, next time I will probably try it.


Weissbier 22_5_07


15-A Weizen/Weissbier


BeerTools Pro Color Graphic


Size: 16.36 L

Efficiency: 66.0%

Attenuation: 76.0%

Calories: 166.62 per 12.0 fl oz


Original Gravity: 1.050 (1.044 - 1.052)

====================#===========


Terminal Gravity: 1.012 (1.010 - 1.014)

================#===============


Color: 4.5 (2.0 - 8.0)

==============#=================


Alcohol: 5.0% (4.3% - 5.6%)

================#===============


Bitterness: 13.17 (8.0 - 15.0)

===================#============


Ingredients:


4.75 lbs Pale Wheat Malt

4.75 lbs Pilsner Malt

0.75 oz Hallertau Mittelfruh (3.2%) - added during boil, boiled 60 min

0.5 oz Hallertau Mittelfruh (3.2%) - added during boil, boiled 10 min

1.0 ea White Labs WLP300 Hefewizen Ale


Schedule:


Ambient Air: 70 °F

Source Water: 70.0 °F

Elevation: 0.0 m


00:10:10 Mash In - Liquor: 6.62 L; Strike: 137.7 °F; Target: 120 °F

00:30:10 Rest - Rest: 20 min; Final: 118.0 °F

00:31:10 Infusion - Water: 7.85 L; Temperature: 194.8 °F; Target: 154.0 °F

01:31:10 Sac. Rest - Rest: 60 min; Final: 148.7 °F

02:01:10 Sparge - FirstRunnings: 0.0 L sparge @ 168 °F, 7.19 L collected, 15 min; Second: 9.5 L sparge @ 200 °F, 9.5 L collected, 15 min; Total Runoff: 17.09 L


Notes:


Put some comments here:


Results generated by BeerTools Pro 1.0.26